About This Site
Daily Musings
News
News Archive
Site Resources
Concept Art
Bungie Weekly Updates
Interviews
Movies
Music
Miscellaneous
Mailbag
HBO PAL
Game Fun
The Halo Story
Tips and Tricks
Fan Creations
Wallpaper
Misc. Art
Fan Fiction
Comics
Logos
Banners
Press Coverage
Halo Reviews
Halo 2 Previews
Press Scans
Community
HBO Forum
Clan HBO Forum
ARG Forum
Links
Admin
Submissions
Uploads
Contact
RSS 2.0
![]()
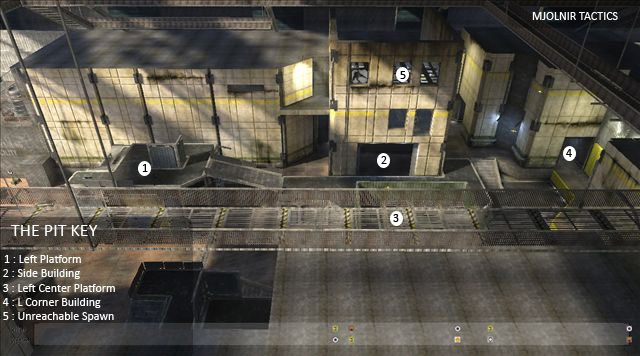
 Description: Software simulations are held in contempt by the veteran instructors who run these training facilities Layout The Pit is a multilevel symmetrical map with a buildings spread all over the hanger. Outside the hanger are two warthogs and pelicans but there is a fence which acts as a level boundary preventing you from getting them. Each side of the map has a platform right up against the fence with a gravity lift and a ramp entrance from opposite sides. There is little cover up there except for a small wall. Down the ramp is another mid sized building with only one level but multiple ways through the building. On the very opposite side from the platform is a small side building which forms a L shape. In the middle of the map is the main structure with two platforms on either side. In the main structure there is a under area which is a three way entrance and a upper area which is a two way entrance leading into a single central room. Connecting the raised walkway between the L shaped buildings on opposite ends of the base is a small structure with a walkway through it to the other side.
FFA Strategies Content Team Strategies Author: Quickstrike NC
The Pit is notoriously known for changing choke points. In the pit, there are 4 different main choke points. If anyone doesnt know, choke points are places where the main battle takes place.
Here are the 4 choke points:
Each place requires a team to work together with progressive strategy. I will brake down each choke point in the writing that follows: Rocket Launcher / Invisible Area Both teams spawn the same distance from the rocket launcher. You should, at the very least, send 2 people for the rockets, and one for the invisible power up. Have one player grab the needler and fire at opponents coming down the hallway. Use your grenades! They are very effective in small hallways. If you can, go quickly grab the Rocket Launcher and get out of the hall way. If your shields are down, take cover, but continue to throw grenades. The guy going for the invisible should grab it, and flank the opponents who are going after the rockets too. Now, since a total of 3 went for the rockets / invisibility, the odd man out must go grab the sniper (Make sure they are atleast decent with it), the regenerator, the overshield, and the other sniper. If the choke point continues to hold at the rocket / invisibility spawns, then gain control of the power weapons, and keep the other team pushed back. Use flanking and routing as an advantage, utilizing all access points at once. Grenades are extreamly effective in this area, and if grenades are thrown correctly, could tally up another victory. If the choke point is lost, then send people to multiple access points towards the choke point at once. If you can, use power weapons to aid your way through. Power drains and grenades are again useful. If you want to clear them out, however, get a juggernaunt (overshield with power weapon) to clear them out and regain the choke point. The Bases Each base are symmetrically the same. So this choke point could be used at either base. First off, you need a sniper. The snipers are the most effective weapons at the bases to hold a choke point. Try and send someone to get another sniper too, so that your opponents cant pick you apart. Utilize regenerators too there fullest. If a teammate is in trouble, a regenerator will help them out and turn situations around. Make sure you have atleast one teammate that has a close ranged power weapon. If someone sneaks up on you, then a close ranged power weapon could easily neutralize the target. Get another teammate that dosent have a sniper or a close ranged power weapon to grab battle rifles to clean up stragglers. The odd man out should man the turret and waste anyone who dares to come close. If the choke point is lost, again utilize many access points to regain it. Power weapons are always useful, but grenades are not. Grenades are not as effective for this specific choke point. If you can get a sniper, pick off the enemy team from a distance and then regain the choke point with ease. Sword / Overshield Area This area is a very complex, yet easy choke point to understand. It is very effective with close ranged power weapons. Snipers and Battle Rifles are very ineffective here. If you can control both shotguns, and the energy sword, then you will succeed without any other thought. Just watch for the grenades and the ripped off turrets, because they could deprive you of your juicy power weapon. You should have 3 teammates with power weapons (both shottys and a sword) and the other one should go for the overshield and should have a mauler in his hip pocket. His primary weapon could be any weapon, but make sure you have a mauler in your possession for emergancys. This teammate is responsible for alerting incoming enemies and cleaning up stragglers. This is the hardest choke point to get back, and requires flanking. Since their are only 2 entrances, you have to go in guns blazing. Try and grab some power weapons if you can, or at the very least a mauler. Your last resort would be to go and rip off a turret, which could actually do some damage. First of all, you must form a perimeter around the base, and then have 2 teams of 2 enter from each side. Throw all grenades throught the holes on the cealing into the room. Then go in guns blazing. You may all die, but you may be able to pick off atleast 2 of them. If you can make it to the choke point fast enough, you can establish a hold before your enemies do. Author: icanfindyu1
One thing that always works good is to let the whole other team go get the rockets. One guy will stay behind. But your team gets the sniper on both sides+regenerators, and your shotgun. Then everyone gets into the sword room and just camps in there. There will be two regenerators so you shouldn't die. Camping in the sword room usually work once you have most of the good weapons. If you have a good sniper and you stay in the sword room your pretty much set, he can take out anyone from far away, and the shotgun/sword can get the people up close. The guy that is going to get the sniper should go and get the overshield. The guy that stayed behind should try and get the invisibility, but then if they can't get any kills to just hide so it will take longer for another to spawn, mean while he can support with a BR. Sometimes, for your team let the other team get the rockets, but then stay out in the open so you can dodge them, and they will waste all the ammo. Then you move into the sword room and camp. If you do that, you player will spawn near and will always have good selection of weapons. If you need a regenerator, you can send an individual person out to get one. ON person should have a sniper and a BR. The next should have the shotgun. The next a sword. And the next person should have a AR+BR or a SMG+BR. |