
About This Site
Daily Musings
News
News Archive
Site Resources
Concept Art
Bungie Weekly Updates
Interviews
Movies
Music
Miscellaneous
Mailbag
HBO PAL
Game Fun
The Halo Story
Tips and Tricks
Fan Creations
Wallpaper
Misc. Art
Fan Fiction
Comics
Logos
Banners
Press Coverage
Halo Reviews
Halo 2 Previews
Press Scans
Community
HBO Forum
Clan HBO Forum
ARG Forum
Links
Admin
Submissions
Uploads
Contact
RSS 2.0
![]()
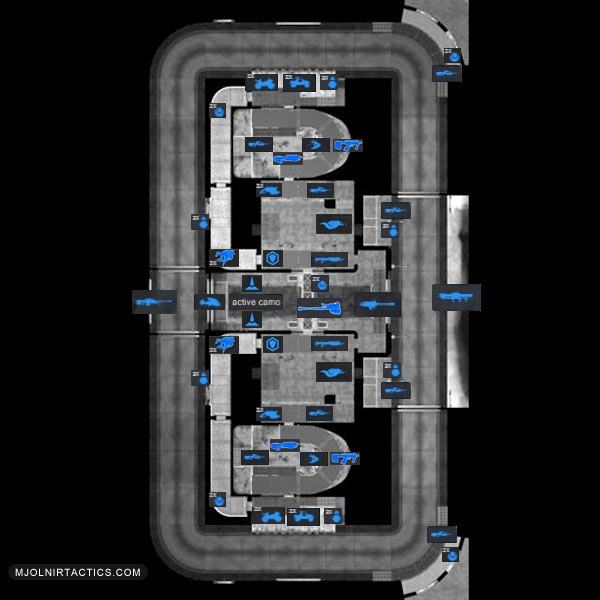
 Description: Snowmelt from Kilimanjaro feeds reservoirs every bit as vital as the fuel and ammunition stores. Layout This map is, essentially, a big figure 8 track. The map is very open and vehicle-based around its perimeter and center, with close combat and medium sized rooms everywhere else. It has two Warthogs and Mongooses parked outside of both bases, and small rooms connecting each base. On the edge of the road, there is a small outdoor road. On the upper road there is a Ghost and Sniper Rifle, below that Active Camo, then a Gravity hammer and a machine gun turret above that, providing a commanding but exposed view, then the Rocket launcher by the cliff. A Pelican is positioned on a landing platform visible from the track, but it is unusable and unaccessible due to death barriers. Pelicans and Hornets fly by in the distance. The inside area consists of 5 interconnected rooms with the main room being the center room that connects to the surrounding track. Each room is connected by entrances on the second and first floors and crates and boxes scattered through out to provide quick transition between the floors.
 FFA Strategies
Team Strategies Content |