Description: Some believe the Forerunners prefer desolate places. Others suggest that a few survived the Flood...
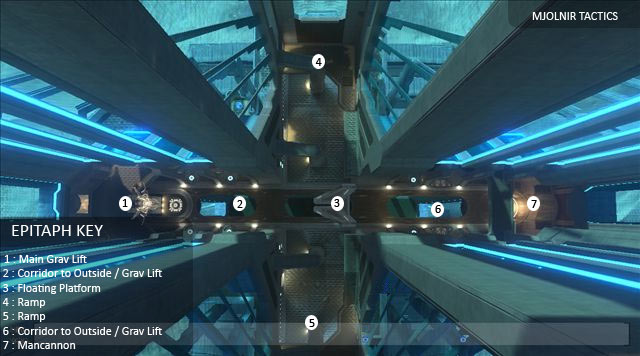
Layout

Epitaph's outside ramps

View of the Epitaph structure
Heavy Arsenal
Energy Sword
Shotgun
Sniper Rifle |
|
Light Arsenal
Assault Rifle
Battle Rifle
Carbine
Pistol
Plasma Pistol
Plasma Rifle |
|
Equipment
Bubble Shield
Radar Jammer |
FFA Strategies
-
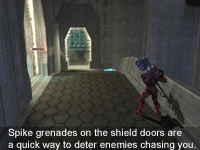
There are many places to use radar effectively on this map. The ramps that wind around the outer edge of the map are good for outsmarting your opponent. Run quickly across the floor from one shield wall to another, to bait someone. Sure enough, an opponent will start shooting and chase you through the shield wall and up the ramps. Run and pretend like you don't realize your being shot at and pursued. This mindlessness ALWAYS encourages the person chasing you to keep doing so. Then as you turn the corner, duck to disappear from motion sensor and pull out your mauler. As the person approaches the corner, jump and drop on him with a shot followed by a melee.
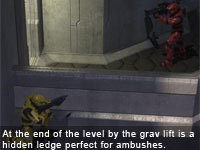
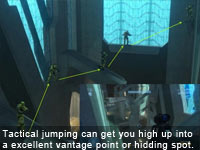
Remember, don't run around on the bottom of the map! You're asking to get killed by someone jumping on your head. Make sure that you're on a higher level as much as possible, to set up ambushes and prevent others from ambushing you. The platforms where the rocket launcher spawns are good, but they're easy to get to, so either move to the ramps nearby or keep an eye on your motion tracker.
-
Let's start off with this: the power weapons are THE most important thing on this map. More than strategy, more than ability (to a point). While it's true that a skilled player can take away the power weapons from noobs who get them first with the right strategy, if the skilled player doesn't pick the power weapons up, if the noobs get them back, they may win. And not just all the power weapons, but the two most important on the map. The rocket launcher and the shotgun. These are THE CONTROL WEAPONS (or TCW as I'll refer to them later on, and they truly are what the name says they are). TCWs on Epitaph can take out any well-oiled team and keep them in the dust if the team with TCWs also grabs at least one mauler and one battle rifle/carbine. If you're playing FFA, it may be wise to get the shotgun first, and wait till the rocket launcher is out of ammo, unless you spawn right by the rocket launcher. Then, grab a battle rifle/carbine. Combined with having a full inventory of grenades (which is also REALLY important), and being able to use them, the shotgun and BR/carbine can stay alive indefinitely. If you're playing team doubles, have the shotgun grab the BR/carbine, and have the rocket launcher grab the other BR/Carbine.
If you've noticed, there's one power weapon that I've kept away from the entire guide. This is the Gravity Hammer. This is because the mauler and shotgun, rightly timed, can take out a Gravity Hammer, no luck needed. Also, unlike the mauler/shotgun, it cannot be used to shoot, making it useless at close/medium range with low shielded enemies (usually achieved by rocket launcher splash damage or grenades). Sure, if you know HOW to use it correctly, a Gravity Hammer is a great weapon, but only at point blank range, and for a reason. You can switch weapons when you have a guy with low shields, but what if you're the one with the rocket launcher? You really don't want to waste precious rockets, or grenades, really, even though they're more plentiful. I personally find it unpredictable, at least much more so than a mauler/shotgun. That is why my recommendation is to stay away from it. If need be, guard it when you kill someone who has it, but don't pick it up.
Your beginning strategy depends on your starting position. If spawned near the shotgun, grab it. Then, DON'T go up the gravity lift. Instead, run to the corner of the doorways and crouch. If someone was on your radar, and you know they were above you by the pattern they were running, then pull out your assault rifle and take them out first. Don't try to crouch over to the hole and take them out with the shotgun. You will probably pull it off, but why waste precious bullets? You don't have that many, so don't use it if you don't have to. He will probably run right down and look for the shotgun, facing away from you. This will let you spray him with AR bullets. If you don't think you'll get him, use a grenade. Then, look around each corner through the door, and see if there is anyone there. If not, grab the Carbine (I believe it's the Carbine there, I don't have my Halo 3 to check right now, I'm actually sitting in the Student Union Building at BSU, if it's the BR, grab that). Then, go to the gravity lift. Decide if there is anyone above you, and how far away they are. Use your better judgment to decide which weapon to use up the gravity lift. IF HE IS NOT IN RANGE TO USE EITHER WEAPON WELL, WAIT! Then, go up and kill him. The time this should have taken will probably have it so the guy who grabbed the rocket launcher at the start of the game will be out of ammo. The rocket launcher is your biggest threat during the game, because no matter your skill with the shotgun, and how careful you are not to lose it, one unexpected bullet will take this control weapon away from you. Now, take into consideration this: the shotgun is THE gun you don't want to lose. Hardly anyone picks up the BR and carbine. So... if you must die with the shotgun, make sure it goes off the edge. I'm saying this assuming you have enough intelligence to stay on the outskirts of the map with the shotgun instead of going inside (for more than to grab the carbine/BR or switch which part of the outside you're on). Your general strategy is to stay outside, and pick people off near doors.
If spawned near the rocket launcher, grab that. Then, kill the person closest to you, and run to the shotgun area. Check if he went up the gravity lift, if so, kill him and take his weapon. If not, run around the top to the outside, and pick him off from above. Then, take the shotgun. Use the rocket launcher only when you know you can get a kill. For the rest, use grenades and the shotgun. Then, when it's out, grab a BR/Carbine, and use the above strategy.
If not spawned near either, grab a BR/carbine. Then, run outside, and make sure it's not the area where the shotgun spawns. Wait till the rocket launcher guy has run out of ammo, then run upstairs, and find the guy with the shotgun. Kill him from long distance, and take the shotgun. Then, use the shotgun strategy.
|
|
Team Strategies
Team Doubles
The strategy you want to use here is just a modified version of the shotgun strategy. Have both people use a strategy above to gain the shotgun for the player who is better with it. Then, while one person is outside, using the shotgun strategy, the other person is a hunter. He grabs the other mid-range weapon (be it BR or Carbine, let the guy with the shotgun have first pick), and a mauler, and tries to find the guy with the rocket launcher, and kill him before he sees the person with the shotgun. Then, take the rocket launcher, and be a body-guard for the guy with the shotgun. Don't stay really close to him, for you don't want to kill him with a rocket, but close enough to keep him from dying. Use the rocket launcher sparingly, mainly use the BR/Carbine. If someone gets really close to you, don't be afraid to die to take out the enemy. Hopefully you'll spawn near your teammate, who should be close enough for you to grab your rocket launcher before the enemy does. If not, have the shotgun guy grab the rocket launcher and switch it for his BR/Carbine. When the rocket launcher runs out, both people should jump up to the support beams that are by the rocket launcher platform and wait, with BR/Carbine out, for the rocket launcher.
|