
About This Site
Daily Musings
News
News Archive
Site Resources
Concept Art
Bungie Weekly Updates
Interviews
Movies
Music
Miscellaneous
Mailbag
HBO PAL
Game Fun
The Halo Story
Tips and Tricks
Fan Creations
Wallpaper
Misc. Art
Fan Fiction
Comics
Logos
Banners
Press Coverage
Halo Reviews
Halo 2 Previews
Press Scans
Community
HBO Forum
Clan HBO Forum
ARG Forum
Links
Admin
Submissions
Uploads
Contact
RSS 2.0
![]()
CortanaRampantFind CortanaThe ship that Cortana is trapped in is overrun by Flood, including the small spores that act as infestors of dead bodies. Given nothing better to do, these little guys will attempt to rush you and impact on your shields, making them a constant drain on your health. It's easy enough to dodge the effects by moving around, but when you also consider the near-constant presence of tougher Flood enemies, you can see how moving around here without dying will be difficult. The ship is also something of a maze, so finding your way through the level, even disregarding the enemies, can be annoying.It's important to note that you want to take it slow here. While it is possible to rush forward from one door to the next, doing so will cause you to trigger numerous spawns, and it'll be difficult for you to recharge your shields because of the presence of the parasites and the fire that'll be coming your way from the enemies. A basic goal of yours should be to head forward slowly, get the attention of enemies with gunfire, then drop back around a corner and wait for them to come to you so that you can use your weapons on them. You'll find energy swords that work well here; shotguns and dual plasma rifles are also great for taking down the Flood zombies. 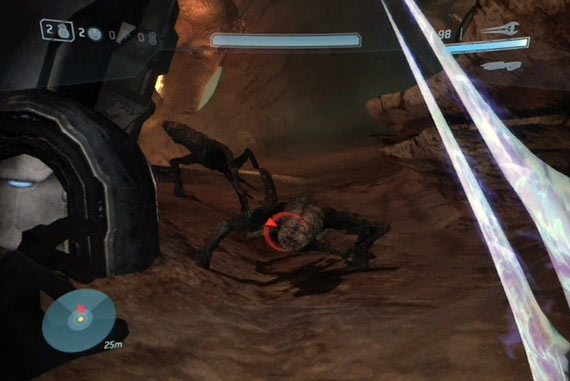 But most importantly, destroy the bodies! Flood zombies will drop to the ground when killed, but can be reanimated by any parasite that finds them and returned to full health. If something drops, keep shooting their body until it disintegrates; you can do this with melee attacks if you want to save ammo. The purebred Flood creatures (which change shape) can't be reanimated, and their bodies can't be destroyed, so don't bother trying this on them. But if you see any bodies of Elites, Brutes, or human soldiers running around, shoot them and don't stop shooting until they pop. Note also that these first few sections have plenty of Flood pods on the walls. Shooting them will release numerous Flood parasites, so avoid using your weapons here if possible. Later on in the mission it can be difficult to avoid accidentally shooting these pods, but you'll just have to deal with it. Into The ShipBegin by heading down the path nearby. You'll eventually be able to head right into a darkened corridor that will lead up to some dead bodies. Some new weapons are here, including an energy sword and a plasma rifle. We found the energy sword to be consistently useful in quickly taking down the tougher Flood members, especially the mock Hunters, so we recommend that you nab it. With it in hand, head through the first door nearby, then drop down into the hole to begin the fun.First ChamberYour general goals here are to survive and to head upwards whenever possible. Without any clear kind of direction, it's pretty easy to get lost if you're prone to that kind of thing, and HUD directions can be hard to come by.After dropping down, you can find a bubble shield near where you land; that'll be useful for when you're attempting to fight melee and ranged Flood at the same time. A group of zombies will attack you just after you drop, too, so be ready for them and stay behind cover, letting them come to you so that you can attack them at close range. Destroy them with the energy sword and destroy their bodies when they die. 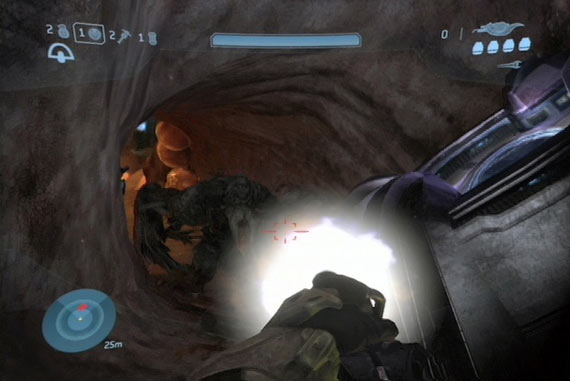 When you're ready to hop up or walk up the ramp here, do so, but be ready for another heavy group of enemies; feel free to backtrack to cover and see who follows you. If possible, hug the left wall and find the small passage that leads to a balcony overlooking the outside area; there's a Pelican here that'll have some equipment scattered around it, including your first Flamethrower. The Flamethrower is a heavy weapon, so it'll slow you down while you use it, but it's a quick kill for most Flood units. There's another large collection of stalker units before the next door. If you can nab the flamethrower, it'll make quick work of them as they approach you. Some of these guys will shift into ranged form, though, so you'll need to use a ranged weapon to take them out. Second ChamberAfter the next door, you'll have a bit of walking to do. There aren't any enemies here, but Gravemind and Cortana will talk to you again.Third ChamberPass through the first group of soldiers here; they clump up and should be easily dispatched with grenades or other area-of-effect weapons. The path beyond them leads to a hole that you can drop through; it'll also have a number of weapons littered about on it, including a gravity hammer and a few fully-charged plasma rifles. Dual-wielding the plasma rifles is a smart move; it'll let you drop zombies quickly and still have an option against ranged Flood attackers. The gravity hammer works well against parasites, but can take multiple hits to take down Flood; stick with the energy sword on Heroic difficulty or higher.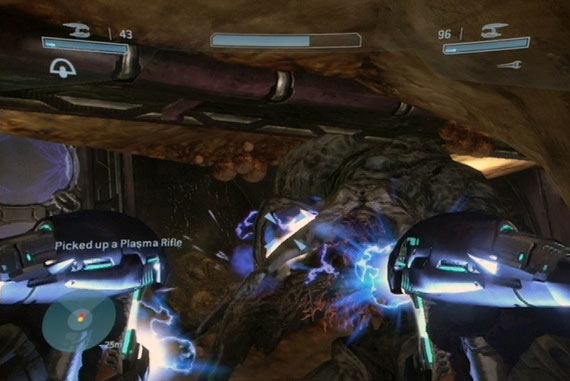 Drop down through the hole and start picking off enemies in the large room nearby, using the little chamber you dropped into for cover. The ranged form of the flood units will start to get very, very annoying here, but if you have dual plasma rifles, you should be able to take them down with burst fire at almost any distance. Keep in mind that just because they're not firing doesn't mean they're dead; they'll be stunned by gunfire and stop shooting for a bit, but will pop right back up in a minute or two. Finish the fight and shoot them until they detach from the wall or ceiling and fall down. But yes, in general, it's best to find a good hiding spot, lure what enemies you can back to your position, kill them and destroy their bodies, then duck out from hiding and use dual plasma rifles to kill off the ranged attackers in the distance. When you're ready to move on, head into the passageway nearby. There's a semi-hidden flamethrower near where Cortana says "Don't look at me! Don't listen!", if you head to the right and find it. It might be less useful to you against the ranged Flood units than it was against the zombies earlier, though. And there are plenty of ranged units in the fleshy, multi-levelled corridor ahead. Instead of getting them with the flamethrower, proceed slowly and use the carbine that you find on them from a distance, one by one if possible. Your progress up the hallway will trigger another zombie attack at some point; if you've found a bubble shield, then drop it, whip out an energy sword, and use that when your enemies get close. With that done, head up through the corridor, killing any remaining enemies, until you reach the next door. Fourth Chamber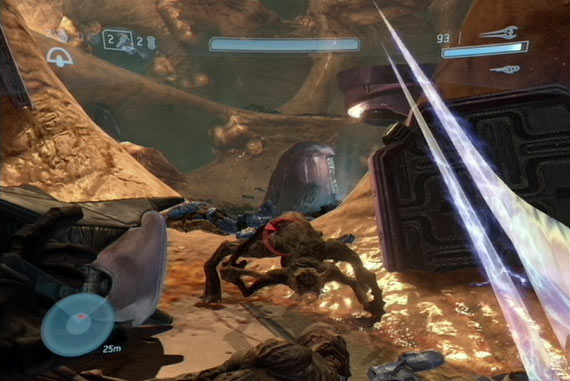 This is a big, open room. As soon as you enter, take some potshots at the zombies and stalkers here, then backtrack through the door and see if any of them follow you. If not, duck back outside and use your grenades and guns to start popping heads. It's especially important to try and lure down the Flood units towards you when they're stalkers and kill them with the energy sword; if you don't, they'll up top and become ranged units. Too many of those will make your life hell. Anyway, when you've made a dent in the enemies here, move out to the center of the room to draw the ranged fire and kill anyone that you can. (Needlers work very well against the ranged forms, if you can find one.) Head up the ramps and make the required jumps to reach the next door. Reactor RoomWhen you reach the reactor room, perform the standard bait and run action, but you probably won't get many biters. There are a lot of full plasma rifles here, as well as some carbines, so you should have plenty of ammo to start picking off your foes. Many of the stalkers won't shift forms for whatever reason, so take them down from a distance.When you get past the reactor room, you'll find Cortana's prison. Use melee attacks to breach it and free her. She'll still yap in your head, but at least now she won't slow you down when she does so. Nor Hell A Fury...Destroy The ReactorHead back to the reactor room and start clearing it again. You'll need to head to the center of the room to drop the three remaining cores, then hit them with explosives to detonate them.Escape High CharityFind the door that opened when you destroyed the reactor and drop down through the hole there. You'll immediately be set upon by zombies, including a couple that wield energy swords. They'll kill you instantly if they get close, so grenade them before that happens.What follows is a trip backwards through the ship. You've seen all of the areas here, so no mysteries await, although there will be new enemies floating around. Despite the seeming urgency, you can take your time, clear the areas, and head back at your own pace here. There'll be some tough fights, but if you stick to the HUD markers, you'll eventually find the Arbiter, who waits near the Pelican you saw earlier. Find him and run into its rear hatch to leave High Charity behind. |